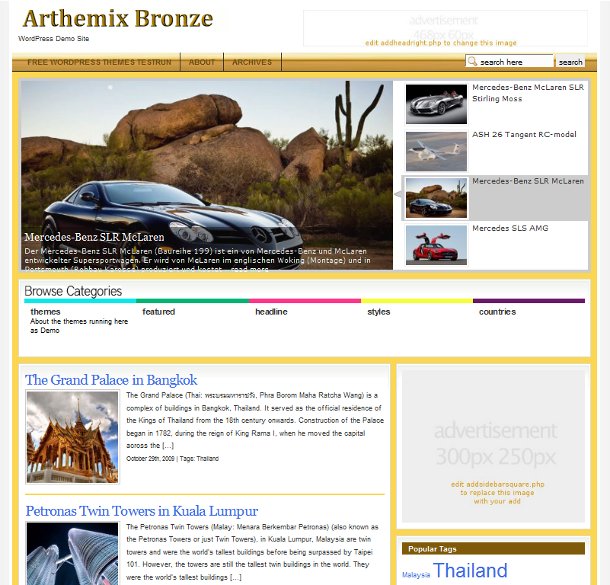
Here you find the download link and the ReadMe to be able to set up the theme Arthemix Bronze

The free Arthemix Bronze Theme features
- Unique layout with a jQuery Content Slider on top of the homapage view
- Automatic Image Resizer (timthumb), to dynamically create and size the thumbnails for the slider and list of posts in front-, category- and tag-view
- A drop down navigation menu for pages
- A colored Category Bar for five selected categories
- A Custom page template for archives, categories and search results
- Widget ready sidebars and footer
- Integrated social bookmarking buttons in single posts
- Integrated banner advertising positions (468×60px and 300×250px)
- WordPress 2.8 compatible
Download: arthemix-bronze.zip Free WordPress Theme Arthemix Bronze (arthemix-bronze.zip, 157KB)
How to start using Arthemix Bronze free: The ReadMe and configuration.
Theme installation: we recommend WordPress Version 2.8+ as the base..
A hint: editing of the theme code in php templates is required to set up and use the theme properly. If you are not comfortable with WordPress and code editing, this theme is not for you.
Installing this theme is quite easy. Once you got the theme and extracted the zip-file, upload the themes folder to your wp-content/themes/ directory.
Now, being in the themes folder on your site, click to the folder /scripts and set the user rights for the cache folder to 777 (files and folders)
Next, login your WordPress Dashboard and go to the Appearance – Themes and activate the theme.
Plugins
There are no additional plugins included as the script to resize images is in the themes folder. You don’t have to install any plugins — the theme works fine and does not require you to install a plugin. However, any plugin will work as with the default theme.
The theme uses the TimThumb PHP script to create and resize the thumbnail images. This script in the /scripts folder requires the /cache folder to be writable – but that we did before (the 777 stuff)
Getting started
Once the theme is activated, the first thing you need to do is to find the IDs of the categories you want to display in the Category Bar.
In your Dashboard under Posts – Categories you find a list of your categories, just hover over a category name and look in the browsers status bar at the end of the line, there should be something like „edit&cat_ID=6“ which means you hover over the category with the ID=6.
BTW: here is also the place to write a short Description under „edit -> Description“
You need to note down the IDs of 5 categories to put into the file index.php in your themes folder.
Now open up your index.php with a text editor (not Writer or Word..)
Not far from the top of this file find: $display_categories = array(5,6,7,8,11) and replace 5,6,7,8,11 with the IDs of the categories you like, separated by comma, maybe like this $display_categories = array(1,3,7,9,10)
Save and upload or just refresh to see if you did it right.
Custom fields to make Images appear in the correct size:
A custom field has to be created in each post with the path to the image you want to show. Under Posts – Edit take your latest post first and scroll down to „Add new custom field“
Under Name you put Image ( with capital i !) and the according value like this wp-content/images/boeing_787_dreamliner.jpg (no backslash in front)
You can not enter an external path like http://farm4.static.flickr.com/3…….eb_o.jpg !! Images have to be on your site in the path you give here.
(Automatic insert from post images, even external ones, you can find in go41-themes you paid for)
You only need to create any new key once, later can select this key from the drop down list in your Custom Fields section and assign a value to that key for every post.
Automatic thumbnail resize problems?
Some important things to note regarding automatic image resizing
The theme uses the TimThumb PHP script to automatically create and resize the thumbnail images.
* TimThumb requires the GD library, which is available on any host sever with PHP 4.3+ installed.
* The theme has a cache folder for the thumbnail images located at \Arthemix-xyz\scripts\cache which requires proper write permissions. Most servers do not allow this by default, so be sure to manually change the /cache/ folder permissions to 777 (or 755 in some cases).
* Use paths as explained above for your images in the custom fields.
Sidebar and Bottom content:
Under Appearance you find a link to Widgets, you see available widgets supplied by WordPress and eventually any plugin and you see on the right of this screen the Sections of the theme ready to take a widget.
Just drag them in and activate them.
Any Content the theme displays by default will be completely replaced by the first widget in this section! However, „deleting“ all widgets in a section will show the default content.
Threaded Comments
The theme supports WordPress’s in-built threaded comments functionality. To use this feature you need at least WordPress 2.7+ and you have to enable it on your Settings > Discussion page. Recommended comment nesting level: up to three levels deep.
We recommend to tick off „Break comments into pages..“, means do not paginate them – a long story not to discuss here.
Advertisements
There are three main advertisement places in the theme. For your convenience these are located in three different files, eg. addbannercontent.php (486x60px), addheadright.php (486x60px) and addsidebarsquare.php(300x250px) in you themes folder.
These files contain only a link to the image replacing your adds. ( like this: img src=“ php bloginfo(‚template_directory‘); /images/banners/square.jpg“ alt=“banner square“ )
So by replacing this line with your script you will load your advertising in the according places.
Having problems? Ask for help in our forum!